
Joel Bodenmann
-
Posts
2,662 -
Joined
-
Last visited
-
Days Won
2
Content Type
Forums
Store
Downloads
Blogs
Everything posted by Joel Bodenmann
-
That would be the best case scenario, yes. If you can manage to do that, then you won't have any other problems. Once you have that setup you can simply add the µGFX makefile as per the documentation. Here's a very good example for that: https://wiki.ugfx.io/index.php/Using_ChibiOS/RT
-
Hello @Mad River, Thank you for your feedback - I put it on our ToDo list to improve the integration documentation. I'll work on that the next week. First we have to clarify whether you're really having a project that uses an external Makefile. The keyword here is external. Some Eclipse environments are setup to generate a makefile for you, but in that case you want to use the single-file-inclusion instead of using the makefiles of uGFX. You still can use our makefiles with the generated Eclipse Makefile but I'd really not recommend you doing that unless you are very experienced with that and you know exactly what you're doing - it can and it will be very daunting. So, first thing: Could you please tell us whether you're using an existing, external makefile? If not, please use the single-file-inclusion and let us know if you have any problems. As always, we'll try our best to help you as quickly as possible Edit: Just saw your second post. You're definitely using the automatically generated makefiles. Unless you find a proper 3rd party guide on how to add path variables to those I'd recommend you using the single file inclusion. Maybe @inmarket could help though. Looking through your Makefile I see that it includes the sub-makefiles of the µGFX library but unfortunately it includes also all driver makefiles, that is wrong. And it appears to be misisng the path variables. To be honest I'm also not too experienced with the recent version of Eclipse. Please try the single-file-inclusion mechanism. It will be a lot easier. Follow the Keil µVision guide linked in a previous post.
-

Ugfx with Chibistudio (Chibios) Embest STM32F4 BB
Joel Bodenmann replied to Sinalco94's topic in Support
I think you forgot to add the ChibiOS board files to your compilation tree and include path. Check out the \boards\base\Embest-STM32-DMSTF4BB\example_chibios_2.x directory inside the µGFX library. You'll find the ChibiOS board files that we used back then in there. pal_default_config and boardInit() are defined in there. -
Unfortunately, we don't have a dedicated guide for that IDE yet. If you'd like to write one once you're done, we'd highly appreciate that If you're using the single file inclusion mechanism then the workflow with the Eclipse based IDE will be exactly the same as the one with the Keil µVision one, so you can have a look at this guide: https://wiki.ugfx.io/index.php/Using_Keil_µVision_5_MDK-ARM It's just different dialogs to add the files and paths, but what you have to do is exactly the same. If in doubt, don't hesitate to ask. We're happy to help wherever we can.
-
I'd strongly recommend you to try everything without DMA first. Once you have that working, you can start dicking around with that. It has been a long time since I last looked at the SSD1289 driver (in fact, that is the driver that made me start writing µGFX back in the day) but I am pretty sure that the driver works well. It is definitely taken care of by the driver that there are no double writes or anything like that.
-
Hello @Mad River and welcome to the µGFX community! As mentioned in the documentation, there are two proper ways of adding the µGFX library to an existing library: Using the makefiles or using the single-file-inclusion mechanism. If the IDE for choice already supports Makefiles and if your project is already makefile based then that is the easiest solution. Otherwise, please use the single-file-inclusion mechanism. Both are explained in the documentation and for both there are step-by-step examples for specific IDEs (take the Keil µVision one as a guide for the single-file-inclusion and the ChibiStudio one for the Makefile). There are plenty of demos available in the /demos directory where you can grab both the application code and the corresponding configuration file from.
-
Migrating to uGFX for LPC3250 uP and HiMax display
Joel Bodenmann replied to Joe Stepien's topic in Support
Before we keep writing huge texts that are largely unnecessary and probably partially ignored: Could you please clearly state how you added the µGFX library to your existing project? As mentioned there are different ways to do that. The recommended one is to use the single file inclusion mechanism. The documentation to that has already been linked above. Are you using that? -
Please delete that organization on github immediately. It is very misleading and careless of you to create an organization on github with the name of a company you're not involved in. This can lead to serious problems for all parties (you, us and users & customers that might get wrong code & information from there).
-
Ugfx with Chibistudio (Chibios) Embest STM32F4 BB
Joel Bodenmann replied to Sinalco94's topic in Support
Hello @Sinalco94 and welcome to the µGFX community! Could you please attach a plain text file containing the entire compiler & linker output of a clean build (make clean!) so we can have a look at that? A couple of things come to mind in form of wild guesses: Are you sure that you're using ChibiOS 2.6? Did you enable the corresponding components (eg. PAL) in the halconfig.h of ChibiOS? -
Migrating to uGFX for LPC3250 uP and HiMax display
Joel Bodenmann replied to Joe Stepien's topic in Support
Glad to hear that you are proceeding with this Once you have a GOS port the best way is to disable all the modules in the configuration file (including the GDISP module). So make sure that all GFX_NEED_XXX such as GFX_NEED_GDISP are either set to FALSE or commented out (as FALSE is the default value for those). Try to compile a hello-world program (basically a main() where you call gfxInit() and nothing else). This way you can ensure that your build setup is working correctly. You can also run one of the GOS demos that you can find in /demos/modules/gos to ensure that your GOS port is working as expected. Once everything builds and your GOS port works you can enable the GDISP module by setting GFX_NEED_GDISP to TRUE in the configuration file. The GDISP module is one of the modules that requires a driver to compile. The drivers can be found in the /drivers/gdisp directory. The best thing is to use the so called TestStub driver first. This is a driver that implements all the interface required to compile but has no implementations (so it doesn't actually to talk to hardware) but it allows to ensure that everything is building correctly. Once you're this far it's time to either use an existing GDISP driver or writing your own. When using an existing GDISP driver you have to include the driver's source file in your compilation and the driver directory in the compilation/linking path. The various guides in the wiki explain how to do this. GDISP drivers require a board file. Each driver has a file named board_xxx_template.h in the driver directory. Copy that file to your project and rename it to board_xxx.h where xxx is the given name of the driver. The board file is the place where you actually tell the driver how to talk to the display. It usually contains the SPI, I2C or parallel peripheral HAL function calls. When I understand you correctly you're working with a setup that already has a working framebuffer. Therefore, you can use the existing generic framebuffer driver that you can find in /drivers/gdisp/framebuffer. You'll see that the board file for this driver is especially easy to implement as all you have to do is passing the pointer to the framebuffer in the board_init() function. However, don't forget to also set the proper olor/pixel format with the given #define at the very top of that board file. An additional side note which you might just ignore in case of you don't know what I'm talking about: If your framebuffer is using a packed RGB888 or BGR888 format (24bpp) you have to use the latest repository master branch instead of the latest stable release as there's now an additional dedicated framebuffer driver for that. You can find more info about that in our latest blog post. I hope that helps. Don't hesitate to ask when you have any questions. -
How to move a widget beyond the scope of it's parent
Joel Bodenmann replied to HWG's topic in Support
Okay, here's your example: And here's a ZIP containing the entire code, the two source images and Makefile to run it directly on a Windows machine: win32_custom_rendering.zip There might be some issues with the calculation of the coordinates of the images (line 32 and 37) - I didn't spend much time on it. One of the things that comes to mind is that the image sections are not vertically centered. But this should definitely get you started. There are other things which you might want to consider such as image caching.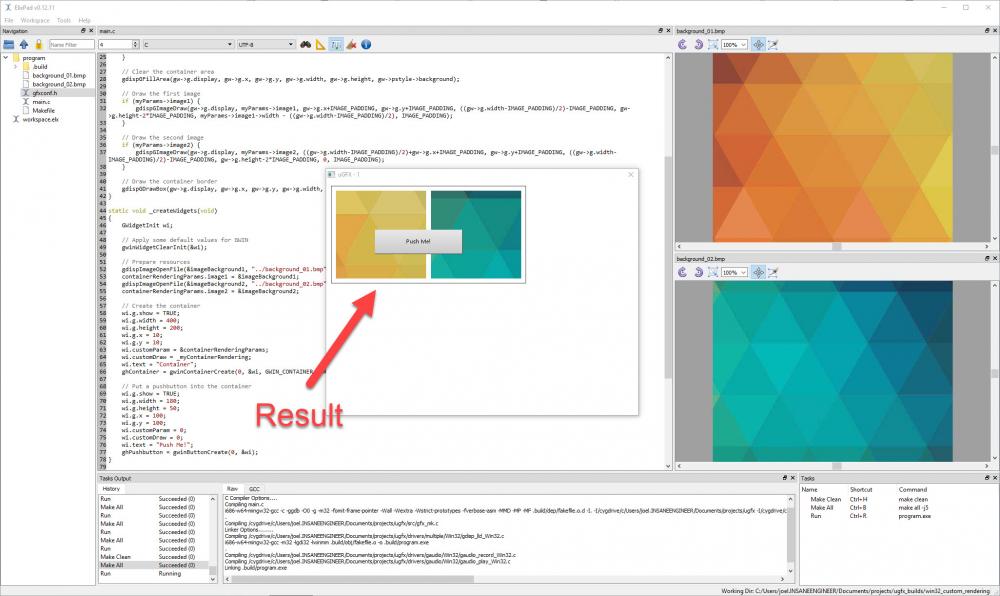
-
How to move a widget beyond the scope of it's parent
Joel Bodenmann replied to HWG's topic in Support
Let us know if you'd like us to write a quick example for this. -
Great, thanks for sharing!
-
Hi, There's currently no driver for that display from our side. However, writing one is very easy. I once wrote one for that display controller but that was for a paying customer that didn't allow us to put it into the public repository. The split areas (two controllers) are not a problem either. Write a driver that handles the full display area and then simply check for the X coordinate and select the appropriate controller to talk to.
-
Sounds great! Publishing your project will definitely help others in the future Don't hesitate to ask if you have any questions. We're happy to help wherever we can.
-
Well, those modules are made to be as cheap as possible. It's very likely that they re-use the same PCB from another module. Not much we can do about that. At least it helps to keep the price down
-
How to move a widget beyond the scope of it's parent
Joel Bodenmann replied to HWG's topic in Support
Hello @HWG and welcome to the µGFX community! You definitely don't have to write your own window manager to achieve this The proper solution is to write a custom widget which is a lot easier than it sounds the interface is well documented and there are tons of examples and even a step-by-step guide on how to do that. However, there's an easier solution: You can take the container widget and write a custom rendering routine for it. In that custom rendering routine you draw your two images by using gdispGDrawImage(). That function allows to specify what portion of an image you want to draw. Writing a custom rendering function is also very easy and well documented and there's also a how-to guide: https://wiki.ugfx.io/index.php/Creating_a_custom_rendering_routine I hope that helps. Please don't hesitate to ask if you have any further questions. We're happy to help wherever we can! -
Glad to hear that you managed to get it up and running. You can post your project in the user projects section: https://community.ugfx.io/forum/6-user-projects/ What do you mean by "printed on"? On the PCB?
-
looking for GUI solution with 5 inch display
Joel Bodenmann replied to ep.hobbyiest's topic in Support
Take one of these SSD1963 based ones and hook it up to the FSMC interface of your STM32 and you'll be fine: http://www.buydisplay.com/default/tft-display/5-inch -
I put that on the ToDo list, thank you for your feedback.
-
Migrating to uGFX for LPC3250 uP and HiMax display
Joel Bodenmann replied to Joe Stepien's topic in Support
Hello Joe, All that #include does is literally copying the contents of the included file into the file at the location of the #include directory. There's nothing that tells you that you can only include header files. In fact, you can include anything. If you want, you can include a word document, an MP3 file or some Java code. It's copy-pasting that the pre-processor handles for you prior to compilation. However, I agree that it is somewhat unusual. Includes are indeed usually just used for header files due to how the software is usually structured on the source code level. The reason for including the C files is exactly what you mentioned: This way we can provide a very easy way to pull in all the source code while automatically resolving all dependencies through the pre-processor by just giving the user one single file to include. To summarize: It's uncommon, but it's completely fine. You must not touch any parts of the µGFX library or the library source code structure. Copy the entire directory to your project and include the gfx_mk.c file. Everything you don't use (like some of the "modules" that you mentioned) will not be included in the compiled binary at all because the pre-processor throws them out. You specify in your configuration file (gfxconf.h, there's an example/template named gfxconfig.example.h in the root directory of the library) what you want to use. Everything that is turned off will be thrown out by the pre-processor. For example: Let's assume you only want to draw raw strings, you don't need the window manager and widgets: Simply set GFX_NEED_GWIN to FALSE (which is actually the default) and the compiler will never even see this code. You can find more information about all this and a complete list of all configuration options with explanations and documentation reference in the wiki. Do not attempt to only include some files and directories yourself. You'll run into a lot of pain. Internally everything is structured to be optimized at pre-processor and compile time. You will not use a single byte of memory or a single CPU instruction if you don't explicitly enable the stuff in the configurations file. No matter whether the directories & files are in your project tree or not. -
Glad to hear that you managed to got it working! Well, somebody screw up the API naming
-
This is normal. The µGFX library heavily relies on the preprocessor. There are very complex constructs in there that those lexers are simply not "smart enough" to comprehend. Furthermore, there are some (or many) things that change during the preprocessing stage. There are defines that get changed one or multiple times during the compilation to create static lists and similar. The sane thing to do is simply disabling the eclipse lexer / interpreter stuff. The compiler is there to tell you when there are issues.
-
Yep, that's also how it's done for the DMA2D stuff. That's definitely the better way of doing it.
-
Migrating to uGFX for LPC3250 uP and HiMax display
Joel Bodenmann replied to Joe Stepien's topic in Support
Hello @Joe Stepien and welcome to the µGFX community! We haven't found a previous post from you in our logs. There's also nothing to review. Not sure what happened there. We haven't heard of any other issue like that before. Let's assume that it was just a glitch or miss-click at some point. Please don't hesitate to let us know if you keep experiencing issues with this forum. The simplest way to add µGFX to an existing project is by using the single file inclusion mechanism. That allows you to add just one single file to your project instead of the entire directory which can become difficult and cumbersome to manage. This is documented here: https://wiki.ugfx.io/index.php/Getting_Started#Single_File_Inclusion We don't have a step-by-step guide for IAR but we have one for Keil µVision which uses the same technique. You can find it here: https://wiki.ugfx.io/index.php/Using_Keil_µVision_5_MDK-ARM That should definitely help you to get started. Yes, it is --> https://wiki.ugfx.io/index.php/Images#Examples Follow the guide above to add the µGFX library to your existing project and you should be ready to go. Of course you have to read a bit of documentation. The µGFX library is very easy to use but very complex inside to achieve that (and other features such as complete portability). Unless you can use one of our ready-to-run projects you'll have to spend a couple of minutes to read through the various articles & guides that you can find in the wiki, some of which are linked above.
