cpu20
-
Posts
130 -
Joined
-
Last visited
Content Type
Forums
Store
Downloads
Blogs
Everything posted by cpu20
-
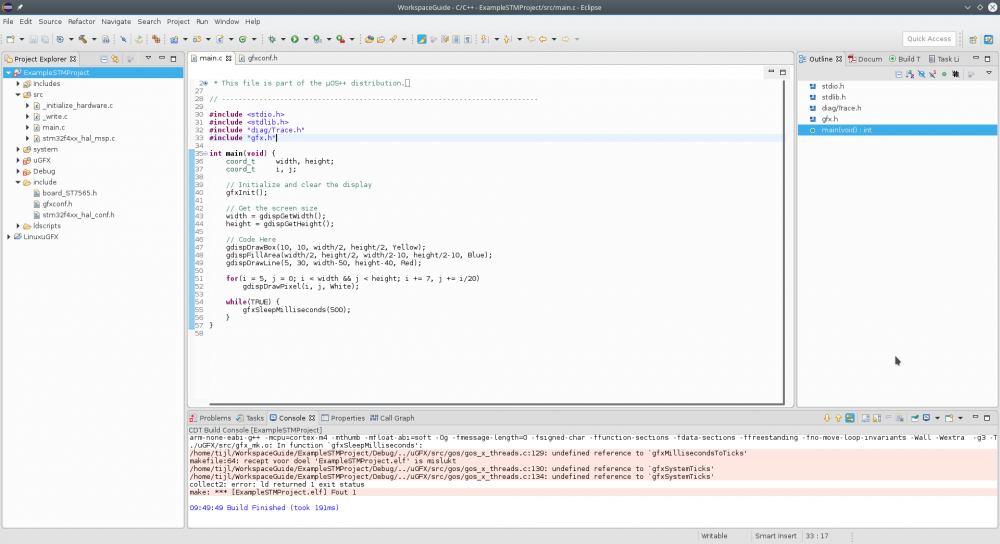
Hi, I have been working with GFILE for logging to a SD-card and found that opening a file for append wasn't implemented yet. This option however is has been implemented in the latest fatfs release. So I downloaded the latest version (0.13) and replaced the current 0.10b version. As far as I have tested it everything seems to work perfectly with the new version and I also implemented the open for append option which works. Maybe this is something to consider for µGFX v3.0? While writing a GFILE-application I also noticed there are no example projects. So I wrote a little example project for fatfs. It's far from perfect but it can be helpful for people starting out with the GFILE-module and fatfs. Gfile_demo_0.13.zip
-
Isn't what @blacktronics is referring to the GWIN_BUTTON_LAZY_RELEASE option?
-
In your file gui.c search for the function called guiEventLoop() and there change the event function to: pe = geventEventWait(&glistener, TIME_INFINITE); For the rest hop over to the wiki and let's get started
-
- As the project build successfully your project is probably set up correctly. - This board currently only has board files using ChibiOS. This means that if you want to go BareMetal (no underlying RTOS) you will have to write the board files yourself. - If you are planning to use ChibiOS you will have to use the MakeFile approach as it is the only viable option to get ChibiOS working in an Eclipse-like environment. There is project available in the downloads section that can easily be imported in Eclipse to get started with this approach: - Going BareMetal means you will have to rewrite the board files using the HAL-libraries or self written libraries. Once they are written you should put them in the include folder of your project. You also need to add the STM32LTDC and STMPE811 driver to the includes and source location of your project. The procedure of including the drivers is described in the Eclipse guide. - The demo in the applications folder can be used by copying all the .c files in your source folder and all the .h files in your include folder. Or if you are using a MakeFile you can just point the GFXDEMO variable to the demo location and it will be included for you. But it is important that you first get a basic program running printing some text on the display or something before playing with the demos.
-
Oh, I'm just stupid. The board isn't being initialized You can remove the HAL_Init() from your main file and add this to your gfxconf.h: #define GFX_OS_PRE_INIT_FUNCTION Raw32OSInit That should do the trick
-
So does removing it from the source location solve your problem?
-
Did you add the rsc folder to your projects "Source Location"? Because that could be throwing all those errors.
-
That's my bad. I forgot to mention that in the "userfonts.h" file I changed the include to: #include "../rsc/DejaVuSans16.c" Normally you don't have to do this when you put the rsc folder inside the inc folder. But for some reason Eclipse wasn't including the file correctly then. I have no idea why though...
-
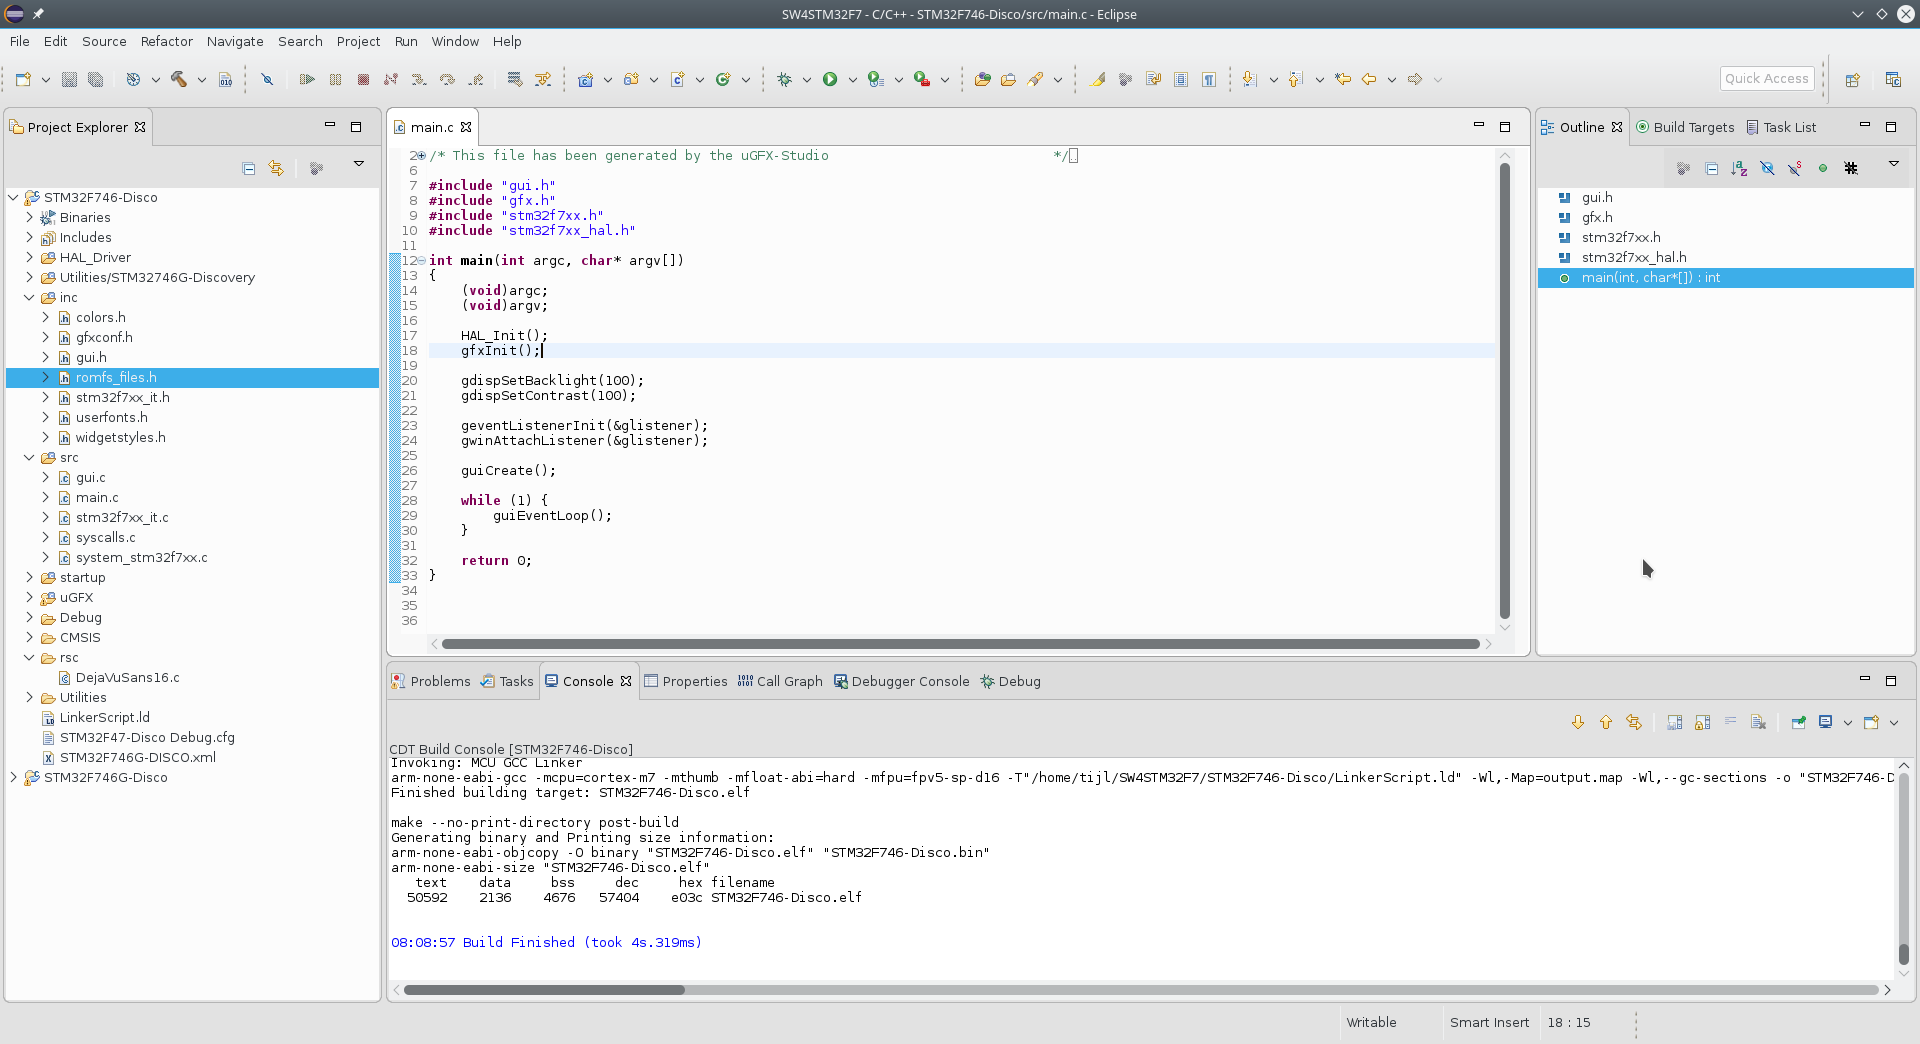
First you'll have to copy and paste the GOS settings from the original gfxconf.h. This is because the studio does not generate these. /////////////////////////////////////////////////////////////////////////// // GOS - One of these must be defined, preferably in your Makefile // /////////////////////////////////////////////////////////////////////////// So copy everything from the original gfxconf.h below this GOS header (and above the GDISP header) and copy it into your new gfxconf.h file. Next for using font stuff you must add uGFX/src/gdisp/mcufont to your include paths in your project settings. Move the rsc folder (containing the font file DejaVuSans16.c) to the root directory of your project and also add it to your include paths. This should be the result. Don't forget to add HAL_Init(); to the beginning of your main program! gfxconf.h
-
Was your backlight not working from the start? Because that needs to be fixed before you can see anything draw on the screen. Looking at your previous post you connected the backlight pin to PD12 (TIM4_CH1)? If I am not mistaken you should change the following in your code: static const PWMConfig pwmcfg = { 100000, // frequency 100, // period NULL, // callback { {PWM_OUTPUT_ACTIVE_HIGH, 0}, {PWM_OUTPUT_DISABLED, 0}, {PWM_OUTPUT_DISABLED, 0}, {PWM_OUTPUT_DISABLED, 0} }, 0, // cr2 0, // dier }; pwmStart(&PWMD4, &pwmcfg); pwmEnableChannel(&PWMD4, 1, 100); If this is set up correctly you should see the backlight come on after the gfxInit() in your code.
-
No problem, happy to help anywhere I can. All the .h files generated by µGFX studio should be copied into your inc dir. However the gui.c file as well as the rsc folder should be copied into your src folder. The compiler is also saying there are some problems in your gfxconf.h. Maybe something went wrong when generating the file in the studio. If changing what I said here does not work, post your gfxconf.h here and I'll take a look where there might be a problem.
-
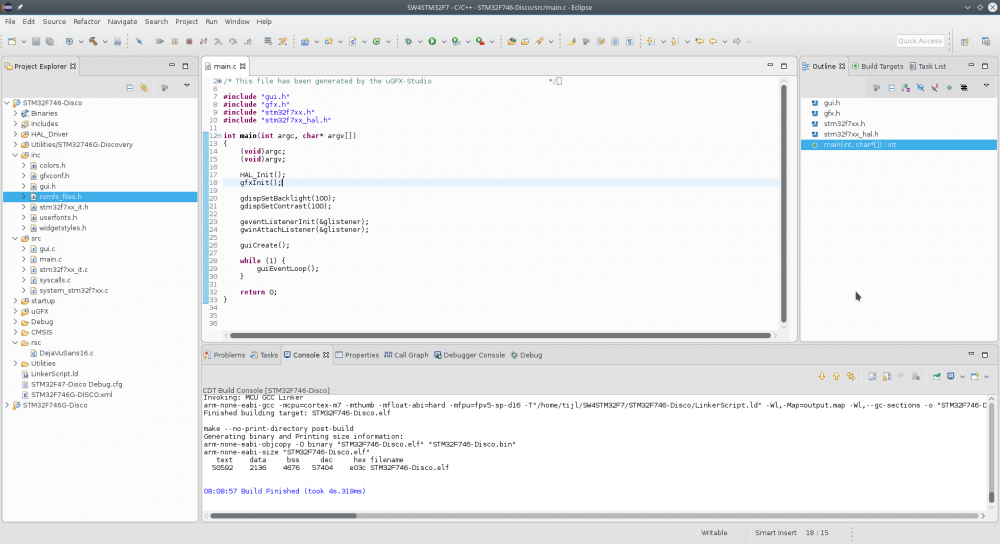
I've looked a little bit further into it and it seems there is an incompatibility between the HAL-driver used by SW4STM32 and the stm32f746_discovery_sdram.c file used for the board. The problem is temporarily fixed by manually editing the inclusions: Use this to get started with and I'll look into fixing the issue properly when I have more time. You will see that when initializing there is some glitching on the screen which gets resolved after the initialization. To use the project just do Import -> Existing project into workspace.
-

Version 1.1.2
1,314 downloads
This is an example project for the STM32F746-disco board for the SW4STM32 platform. -
@Slemi Don't worry, we'll find a way to make it work. I just downloaded SW4STM32 and I get the same errors. The problem lies in the fact that the suite includes alot of files for the board that are giving conflicts. I am trying to resolve everything but it will take some time.
-
Yes, could you give me the output of your error messages? (Console)
-
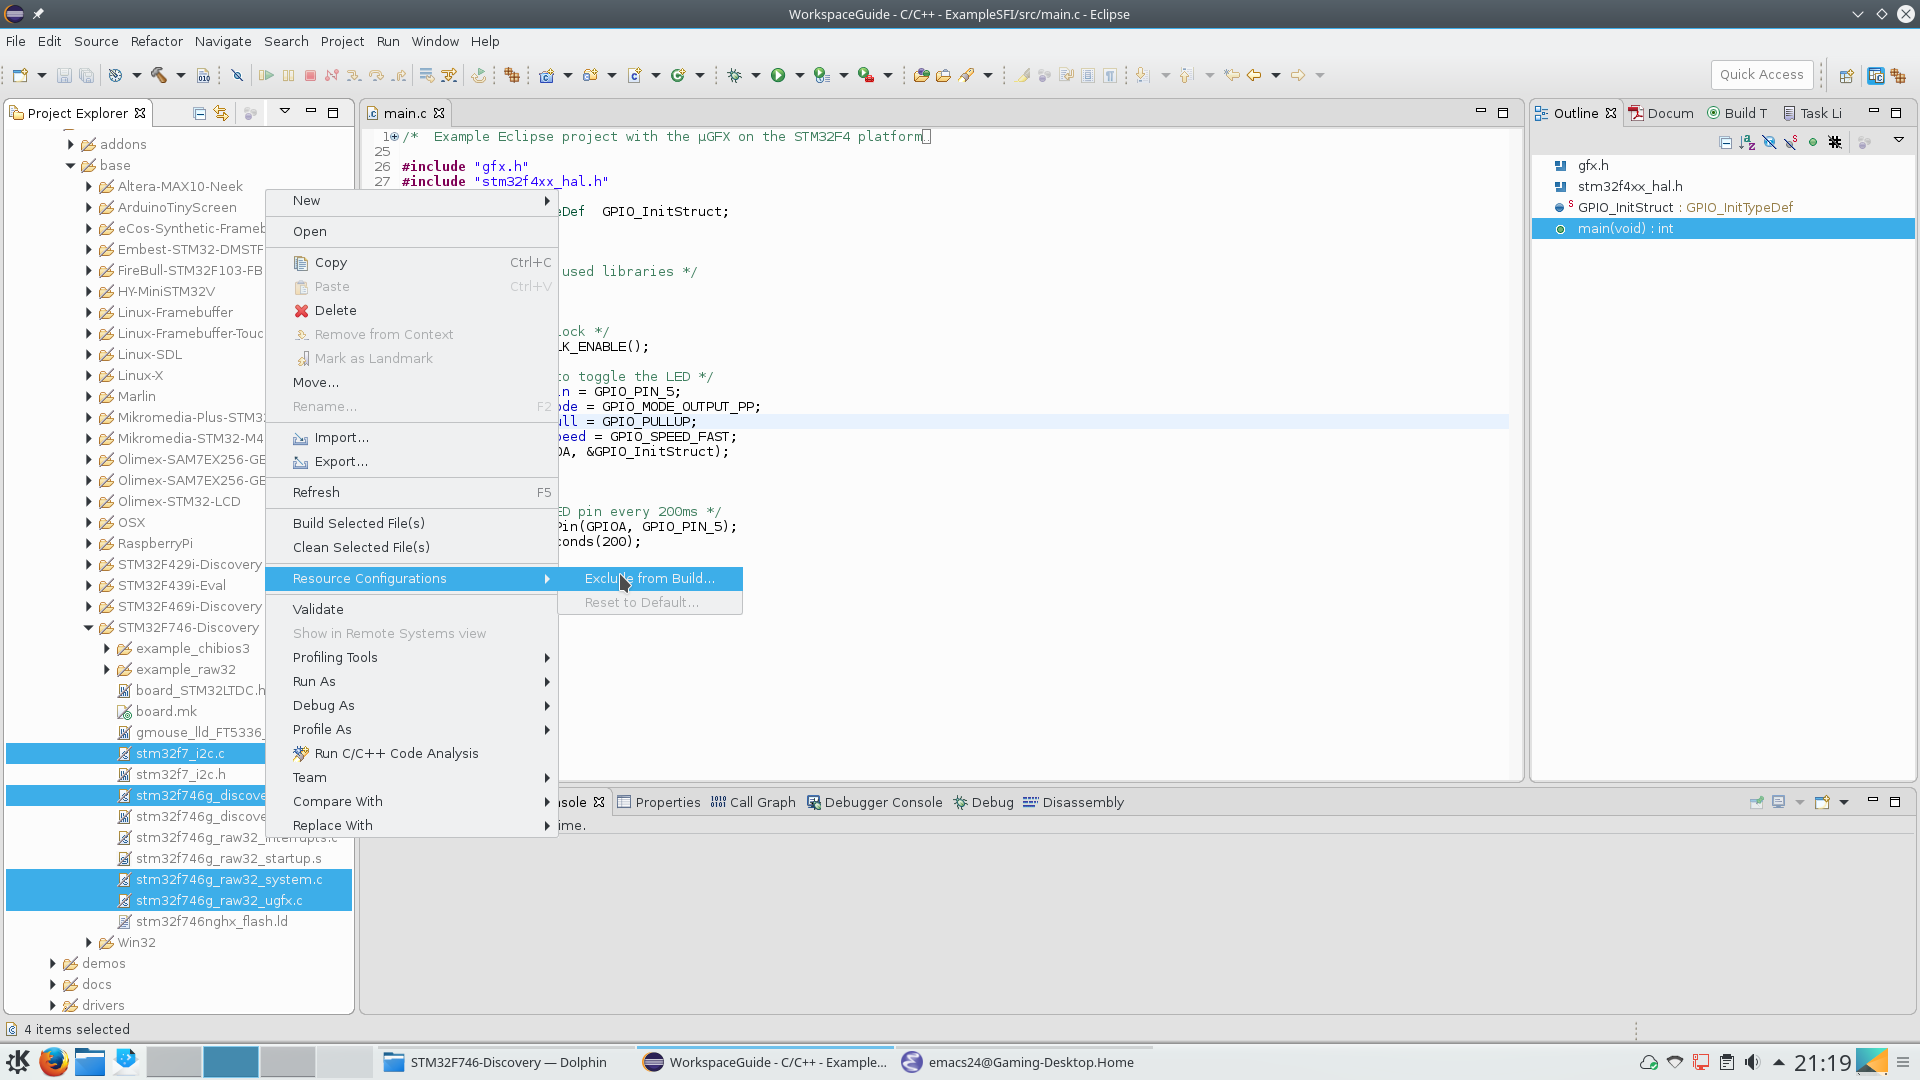
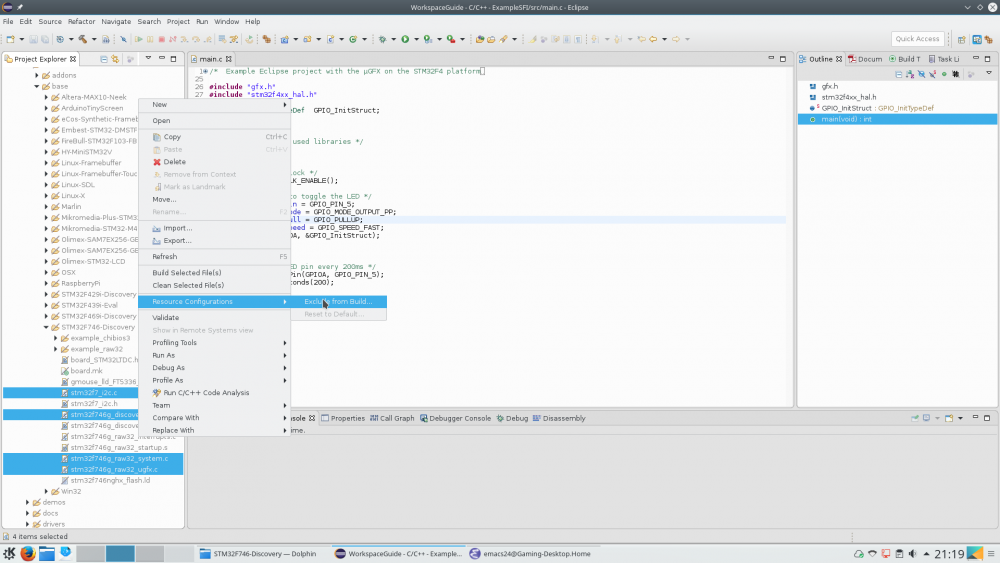
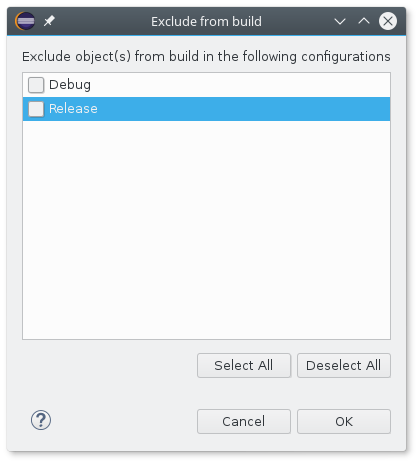
No need for a fire here We are here to help you! You did everything correctly so far. But here we'll have to take another approach as all the board files for the STM32F746-DISCO are already written and ready to be used. So first there is no need to do this: Normally you don't mess with the files in the library itself. You should keep the µGFX library untouched and copy any board files needed to your inc folder. But!!!! don't do that yet in this case! Here it is much easier to just go back to Project -> properties -> C/C++ General -> Paths and Symbols -> Includes. Here you should add the folder /boards/STM32F746-Discovery for all languages again. Doing this will include both the gmouse_lld_FT5336_board.h and board_STM32LTDC.h into your project. One tip I was planning to add in the tutorial: If you want to easily exclude files from your build without having to constantly go back to the filter, you can select them in your Project Explorer, right click and choose Resource Configurations -> Exclude from Build... That will give you this dialog: Deselect all the check boxes here and click OK. The files should now be included in your project. If you want to exclude them again do the exact same thing, but check all the check boxes in the "Exclude from build" dialog. I'll explain it here with the method from the guide but you can also use the above method to include the files. So next go back to Project -> properties -> C/C++ General -> Paths and Symbols -> Source Location tab. First delete the boards entry form the filter list. Now also include the boards/STM32F746-Discovery folder. Here we will have to add a filter also because there are files SW4STM32 already generated that are also in the folder and keeping them both will give conflicts. So in the filter exclude everything in the boards folder except for the following files in the STM32F746-Discovery folder: - stm32f7_i2c.c - stm32f746g_discovery_sdram.c - stm32f746g_raw32_system.c - stm32f746g_raw32_ugfx.c Now you should be able to enable #define GFX_USE_GDISP without getting compiler errors. Let us know if this doesn't work out! Edit: One thing I didn't see is if you included the driver folders (STM32LTDC and FT5336) to your Includes.
-
Version 1.0.0
982 downloads
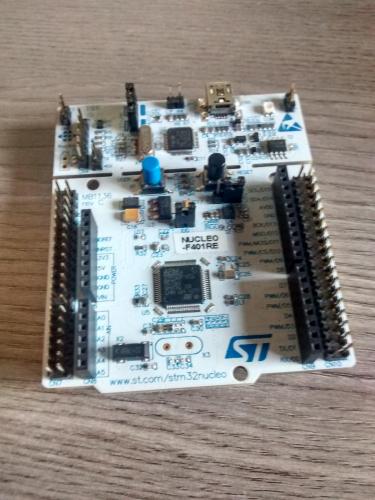
This is an example project for the STM32F4xx microcontroller series with the µGFX library. The project is made in Eclipse and uses no underlying operating system (BareMetal). There are no drivers/modules included in the project yet. These should be added manually as described in this guide. Instructions on how to modify the project for your specific MCU are included in the main.c file. This project has been tested on the STM32F401RE-NUCLEO platform using the GNU ARM Embedded toolchain v5_4-2016q2. -
In your makefile you specify OPT_CPU = stm32m1, but this should be stm32m3. In your main file you do not need to include: #include "board_SSD1289.h" #include "ginput_lld_toggle_board.h" What version of the ugfx library are you using?
-
In this case I don't think that will help much as he is using a STM32F1xx target and it only has one alternate function. @ep.hobbyiest You should keep the second and third change if you changed the pin configurrations in your application. That error you are getting is a problem though. It could indicate that something is wrong with your configuration and that not all the correct files are included. Are you using the Makefile approach or the 'single file inclusion mechanism'? And what IDE are you using?
-
You must use the CS-pin. the F_CS is acturally T_CS which is used for the touchscreen of the display. As for your code there is an example in boards/addons/gdisp for your driver which has a slightly different configuration than yours. Maybe try those settings out also and see if it gives any difference?
-
After debugging alot I think I found the problem. See here for more information.
-
First note that this is a build in function of Eclipse and it has nothing to do with how the project is compiled. What Eclipse does is look at the paths defined in 'properties -> C/C++ General -> Paths and Symbols -> Includes' under the GNU C language tab. Eclipse will look at every define found in the files located at these paths. So if the path where your 'gfxconf.h' is located is defined here this should work fine. If not maybe try indexing the project with 'Index -> Rebuild'.
-
@gregor.slemi@gmail.com The SW4STM32 is just Eclipse bundled with tools specifically for STM32. So you should be able to setup a project fairly easily using this method. Don't hesitate to open a new post when you hare having any problems.
-
gdispSetBacklight(50); // set backlight to 50% gdispSetContrast(50); // set contrast to 50% You can also change brightness and contrast at runtime with these functions. Good to see you got it working!!!
-
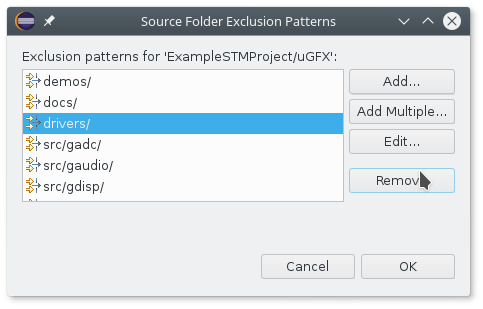
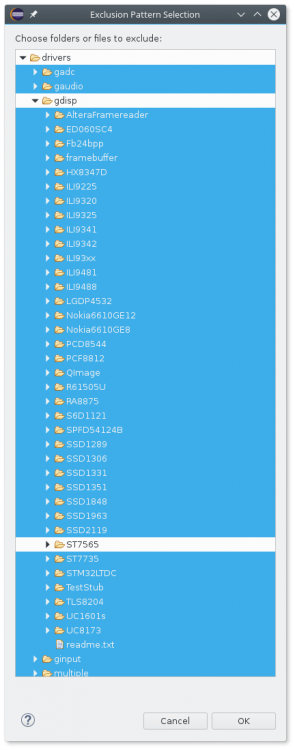
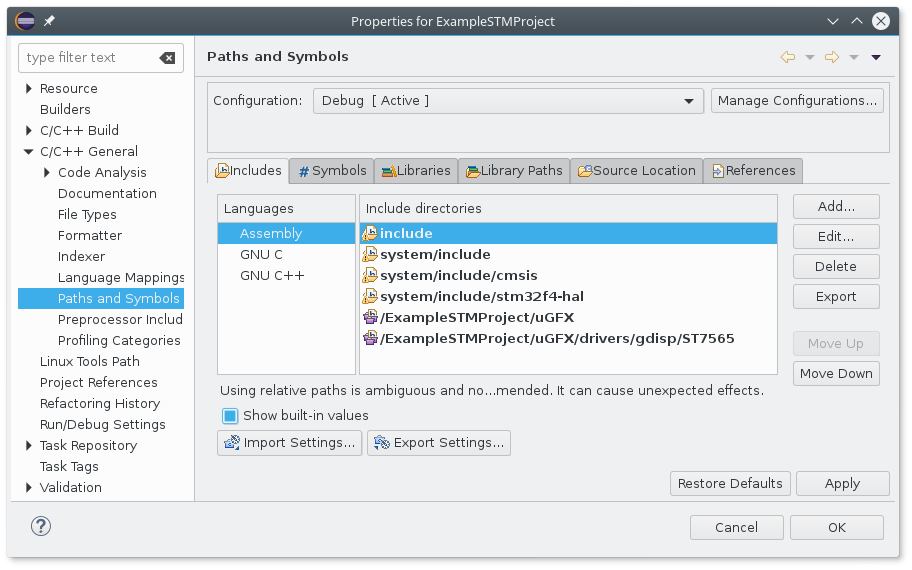
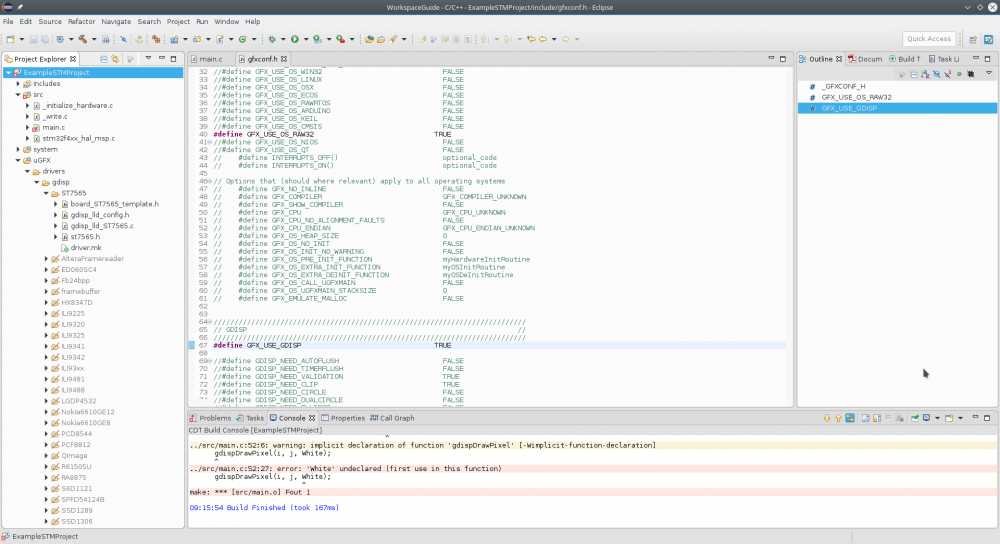
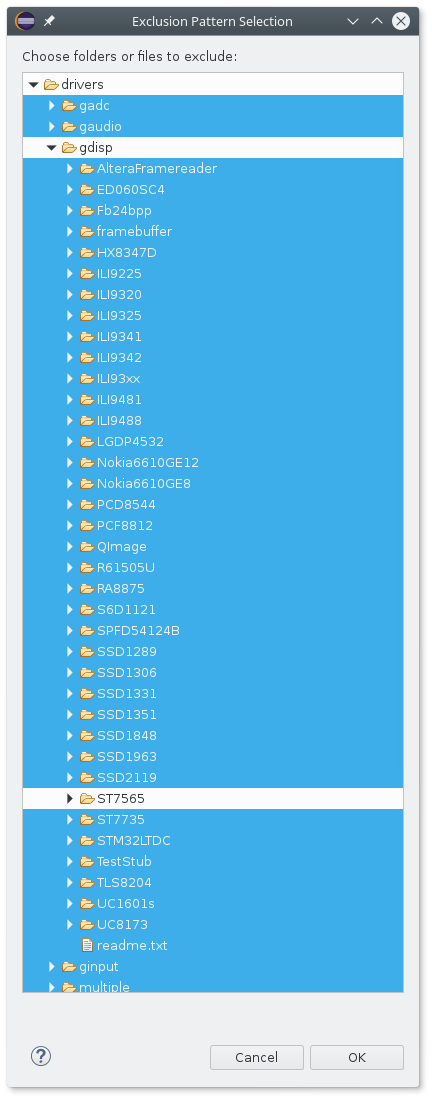
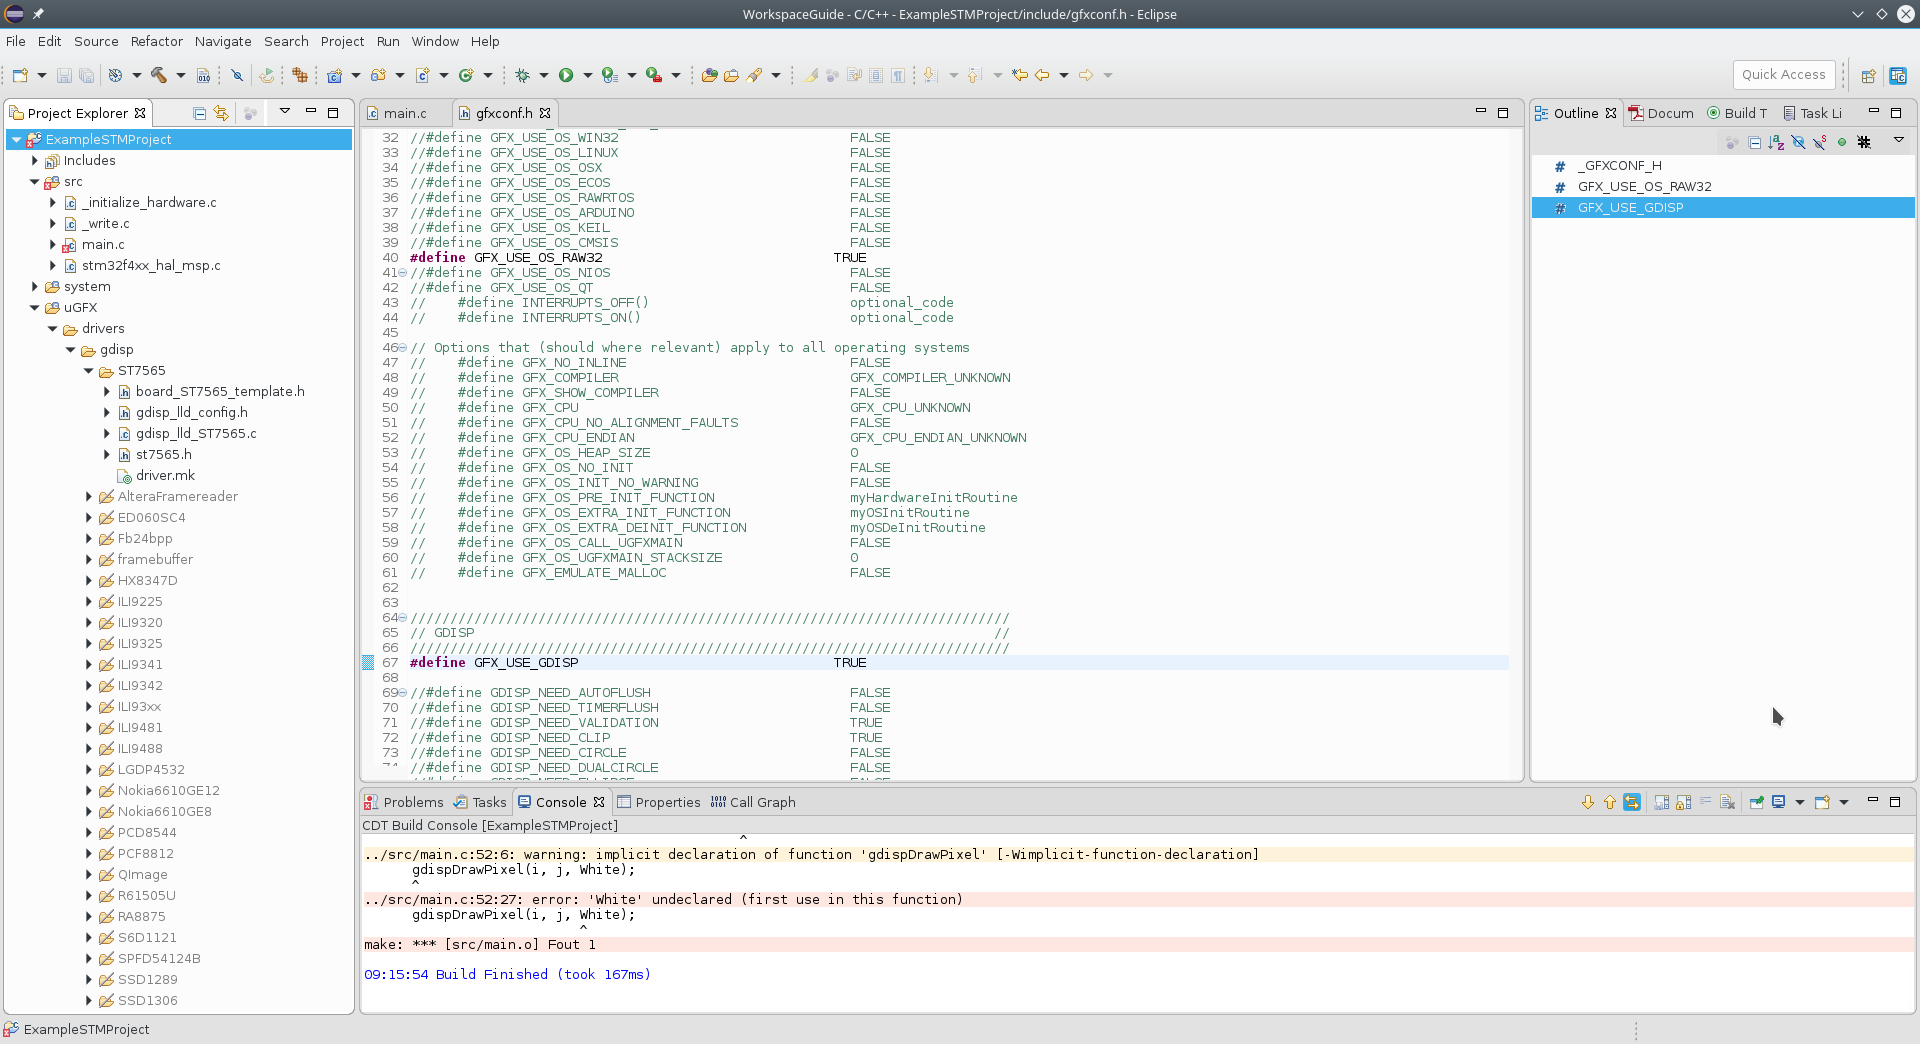
I am not really an expert, more like a hobbyist The guide is coming soon. Exactly, the only thing you should add is the 'gfx_mk.c' and the drivers you want for your project. So first go back to the initial stat where you excluded everything except that file. Now into your project properties go back to 'Paths and Symbols -> Source location' and edit the uGFX filter you've added. Here remove the 'drivers/' entry. Now choose 'Add Multiple' again and exclude everything in the 'drivers' folder except for your driver like this: Don't forget to exclude ginput, gadc,... The last step to get it working is to add the folder 'drivers/gdisp/ST7565' to your include paths: Do this for all three languages! This should be the result in your uGFX directory. What you also must do is copy your own made board file for the ST7565 to your includes directory. This should compile and work as expected. Note that it doesn't compile for me because I haven't setup GOS correctly.